> ## Documentation Index
> Fetch the complete documentation index at: https://docs.libratech.ai/llms.txt
> Use this file to discover all available pages before exploring further.

# Create a Discovery

> Step-by-step: define columns, add documents, run the Discovery, work with results.

<video autoPlay muted loop playsInline src="https://mintcdn.com/libra-4206ec93/azhR9hqtFjs66ITC/assets/videos/features/discovery-create.webm?fit=max&auto=format&n=azhR9hqtFjs66ITC&q=85&s=1a421f6a7b192f32d2eedb387fad1e6b" className="rounded-xl border w-full" data-path="assets/videos/features/discovery-create.webm" />

This guide walks through creating a Discovery end-to-end: define the columns, add documents, run it, verify results, and export.

**The four steps:**

1. [Create a new Discovery](#create-a-new-discovery) (or start from a template).
2. [Add columns](#add-columns) for what to extract.
3. [Add documents](#add-documents) and run.
4. [Work with the results](#work-with-results): verify, edit, and export.

## Create a new Discovery

<Steps>
  <Step title="Open the Discovery section">
    Click **Discovery** in the project section of the sidebar.
  </Step>

  <Step title="Click New Discovery">
    The button sits in the top right of the Discovery list. To start from a ready-made set of columns instead of a blank table, pick one of the template cards on the same page or click **Browse templates** — see [Discovery templates](/en/features/discovery/templates).

    <img src="https://mintcdn.com/libra-4206ec93/DvY4COCBKazHNw7v/assets/images/app/discovery-new-button.png?fit=max&auto=format&n=DvY4COCBKazHNw7v&q=85&s=460563e059a4d7b0826d963517b988a0" alt="Discovery section with New Discovery button highlighted" width="3800" height="2160" data-path="assets/images/app/discovery-new-button.png" />
  </Step>

  <Step title="Name the Discovery">
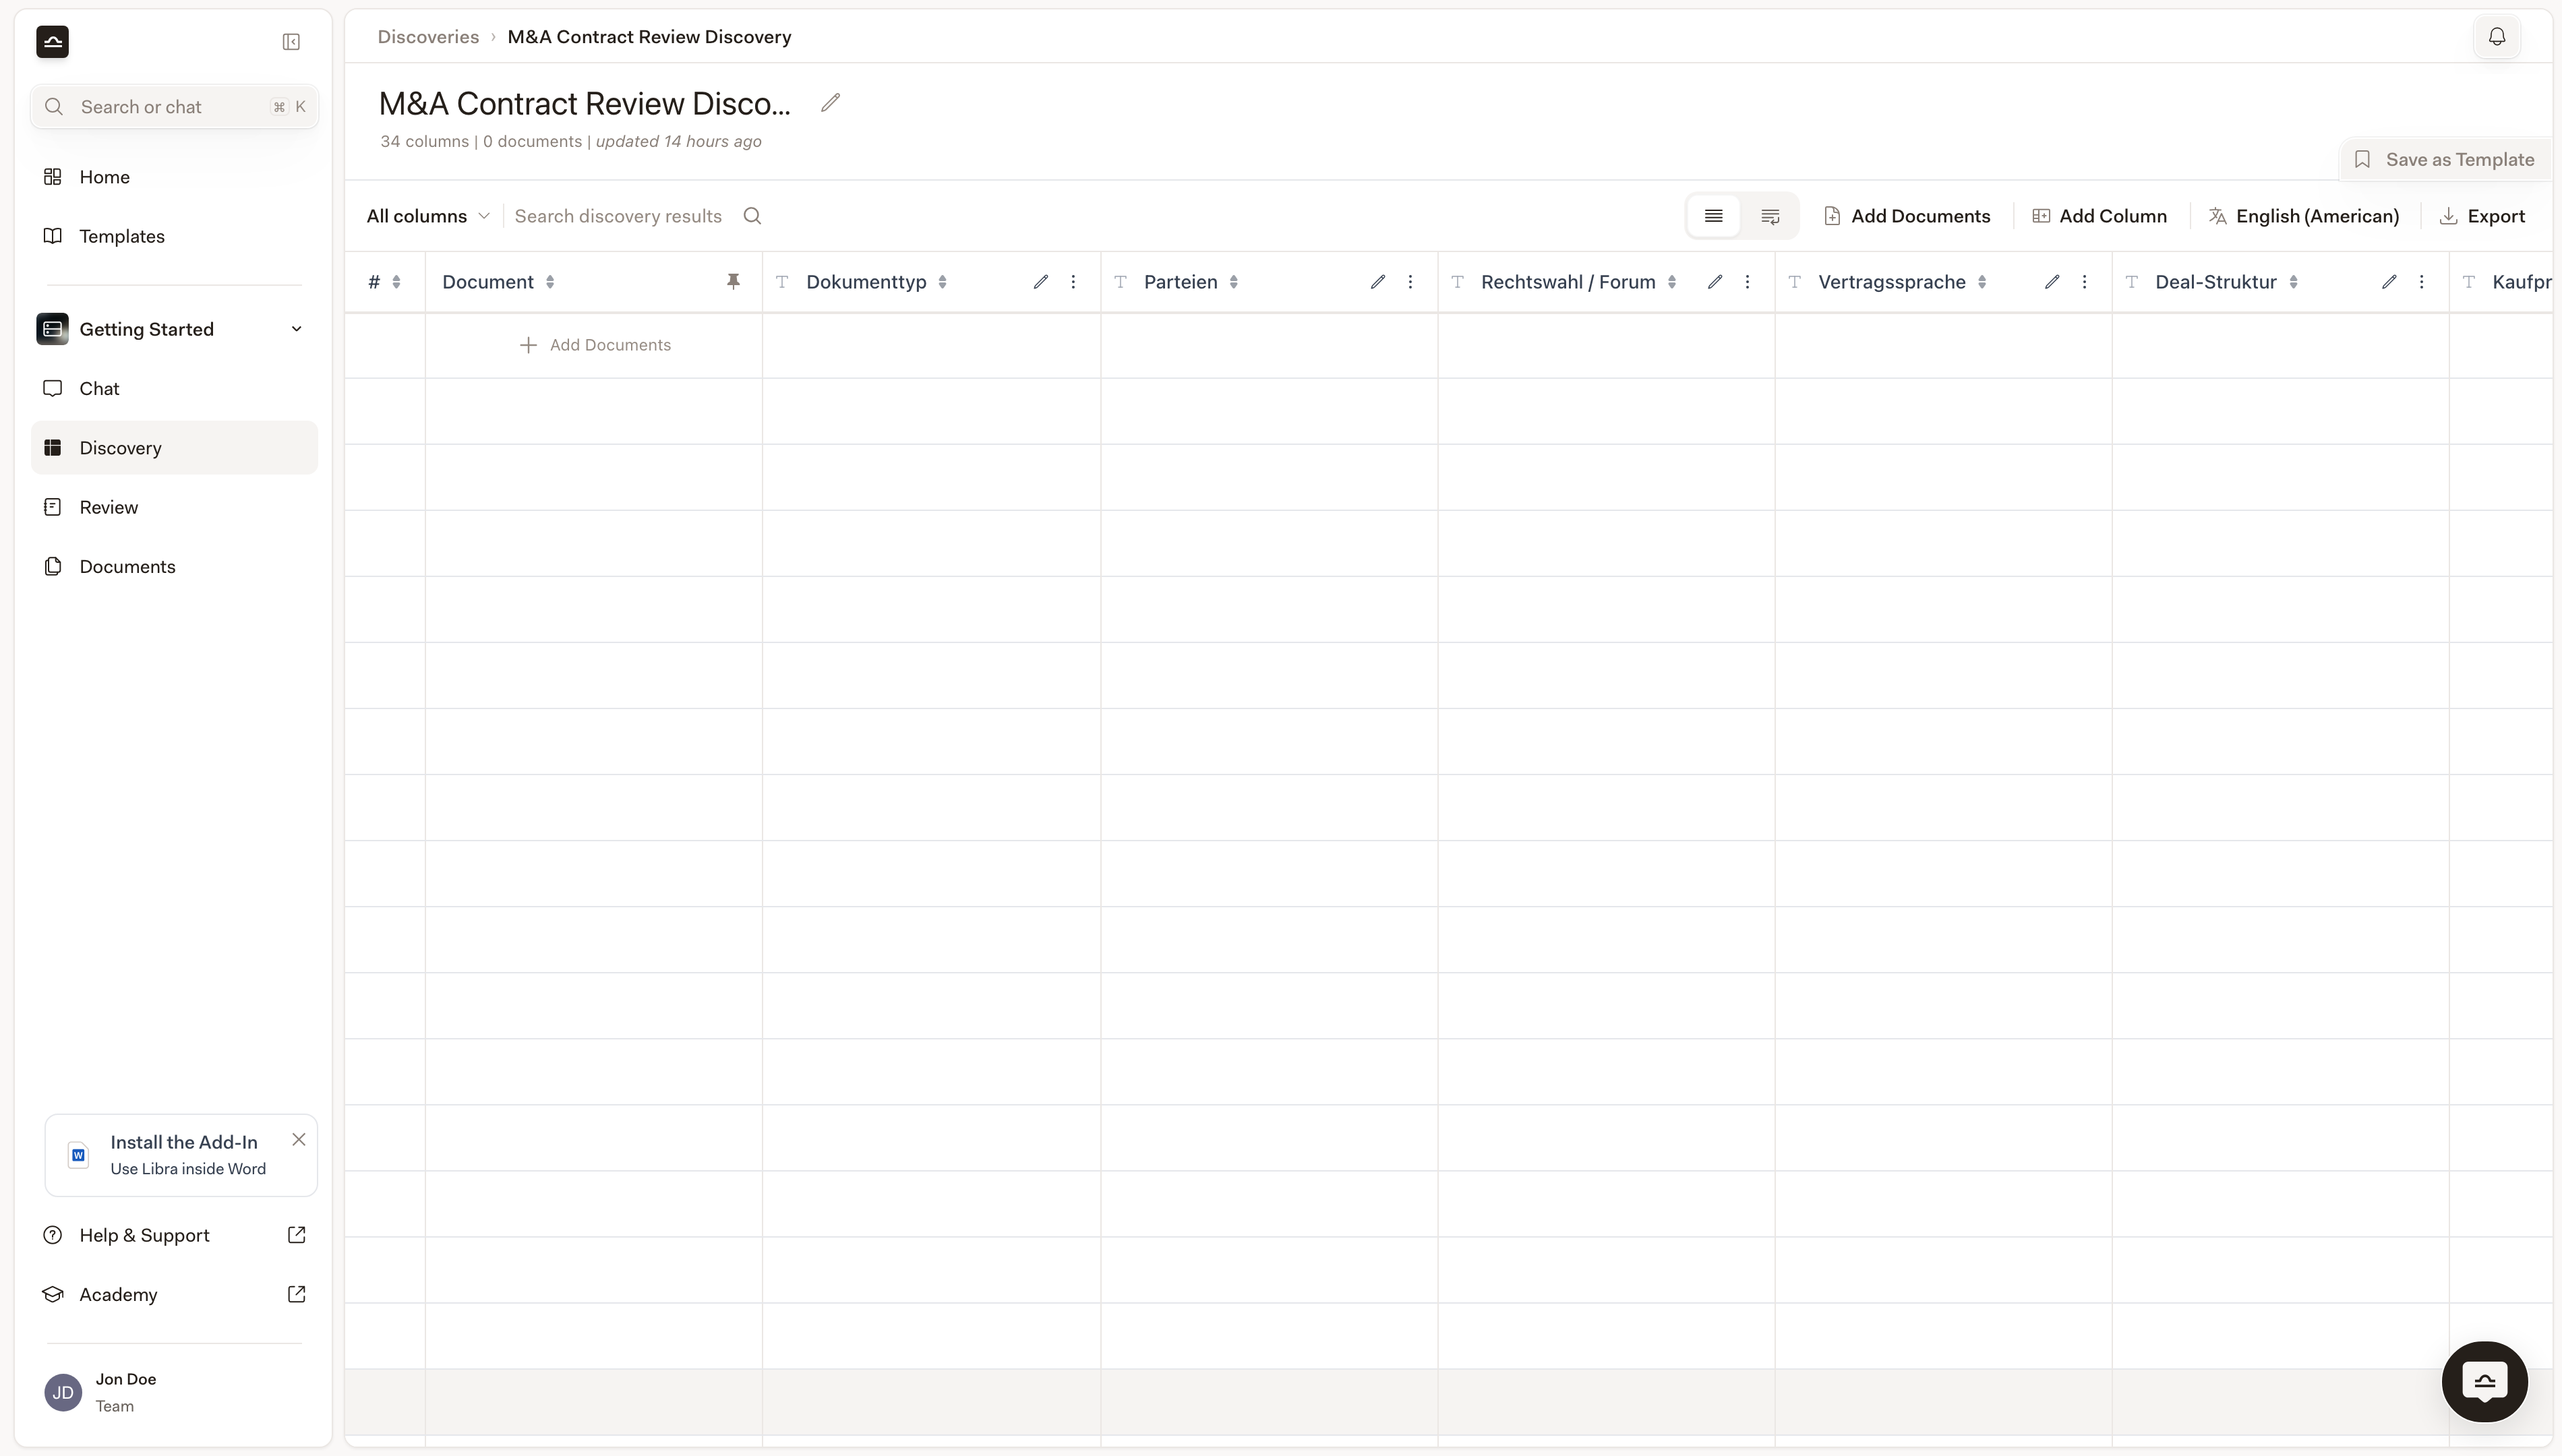
    Libra opens an empty Discovery called **New Discovery** with the title field already focused, so you can type straight over it. A descriptive name pays off later: *"NDA Q4 review"*, *"Lease portfolio extraction"*, *"Employment contracts, Berlin office"*. The name is what you'll see in the project's **Discoveries** folder under **Project files** and in [Search](/en/features/search).

    <img src="https://mintcdn.com/libra-4206ec93/DvY4COCBKazHNw7v/assets/images/app/discovery-empty-table.png?fit=max&auto=format&n=DvY4COCBKazHNw7v&q=85&s=fab08c81dd067e3a06a97abbeac125e9" alt="New Discovery view with empty table ready for columns and documents" width="3800" height="2160" data-path="assets/images/app/discovery-empty-table.png" />
  </Step>
</Steps>

<Note>
  The toolbar carries a button showing a language name, such as **English (American)**. That's the language Libra writes its answers in, and it starts from your interface language rather than the language of your documents. Set it before you run: on a Discovery that already has results, switching it asks you to confirm, and confirming removes those results.
</Note>

<div className="libra-buddy-callout">
  <img src="https://mintcdn.com/libra-4206ec93/wgVZXcGnHS4aJk9T/assets/images/libra-buddy/hopeful.png?fit=max&auto=format&n=wgVZXcGnHS4aJk9T&q=85&s=dda1d151f81c072e70c0c3fbbed970e5" alt="Libra mascot looking hopeful" width="666" height="649" data-path="assets/images/libra-buddy/hopeful.png" />

  <div className="libra-buddy-callout-content">
    Pick the answer type carefully. *Date*, *Number* and *Currency* sort by value; *Text*, *Yes/No* and *Bullet List* sort alphabetically. And editing a column later — its label, its prompt or its type — clears that column's answers and extracts them again.
  </div>
</div>

## Add columns

Each column is a question Libra answers for every document. A Discovery holds up to 50 columns; past that, adding another is refused and you have to delete one first.

<Steps>
  <Step title="Click Add Column">
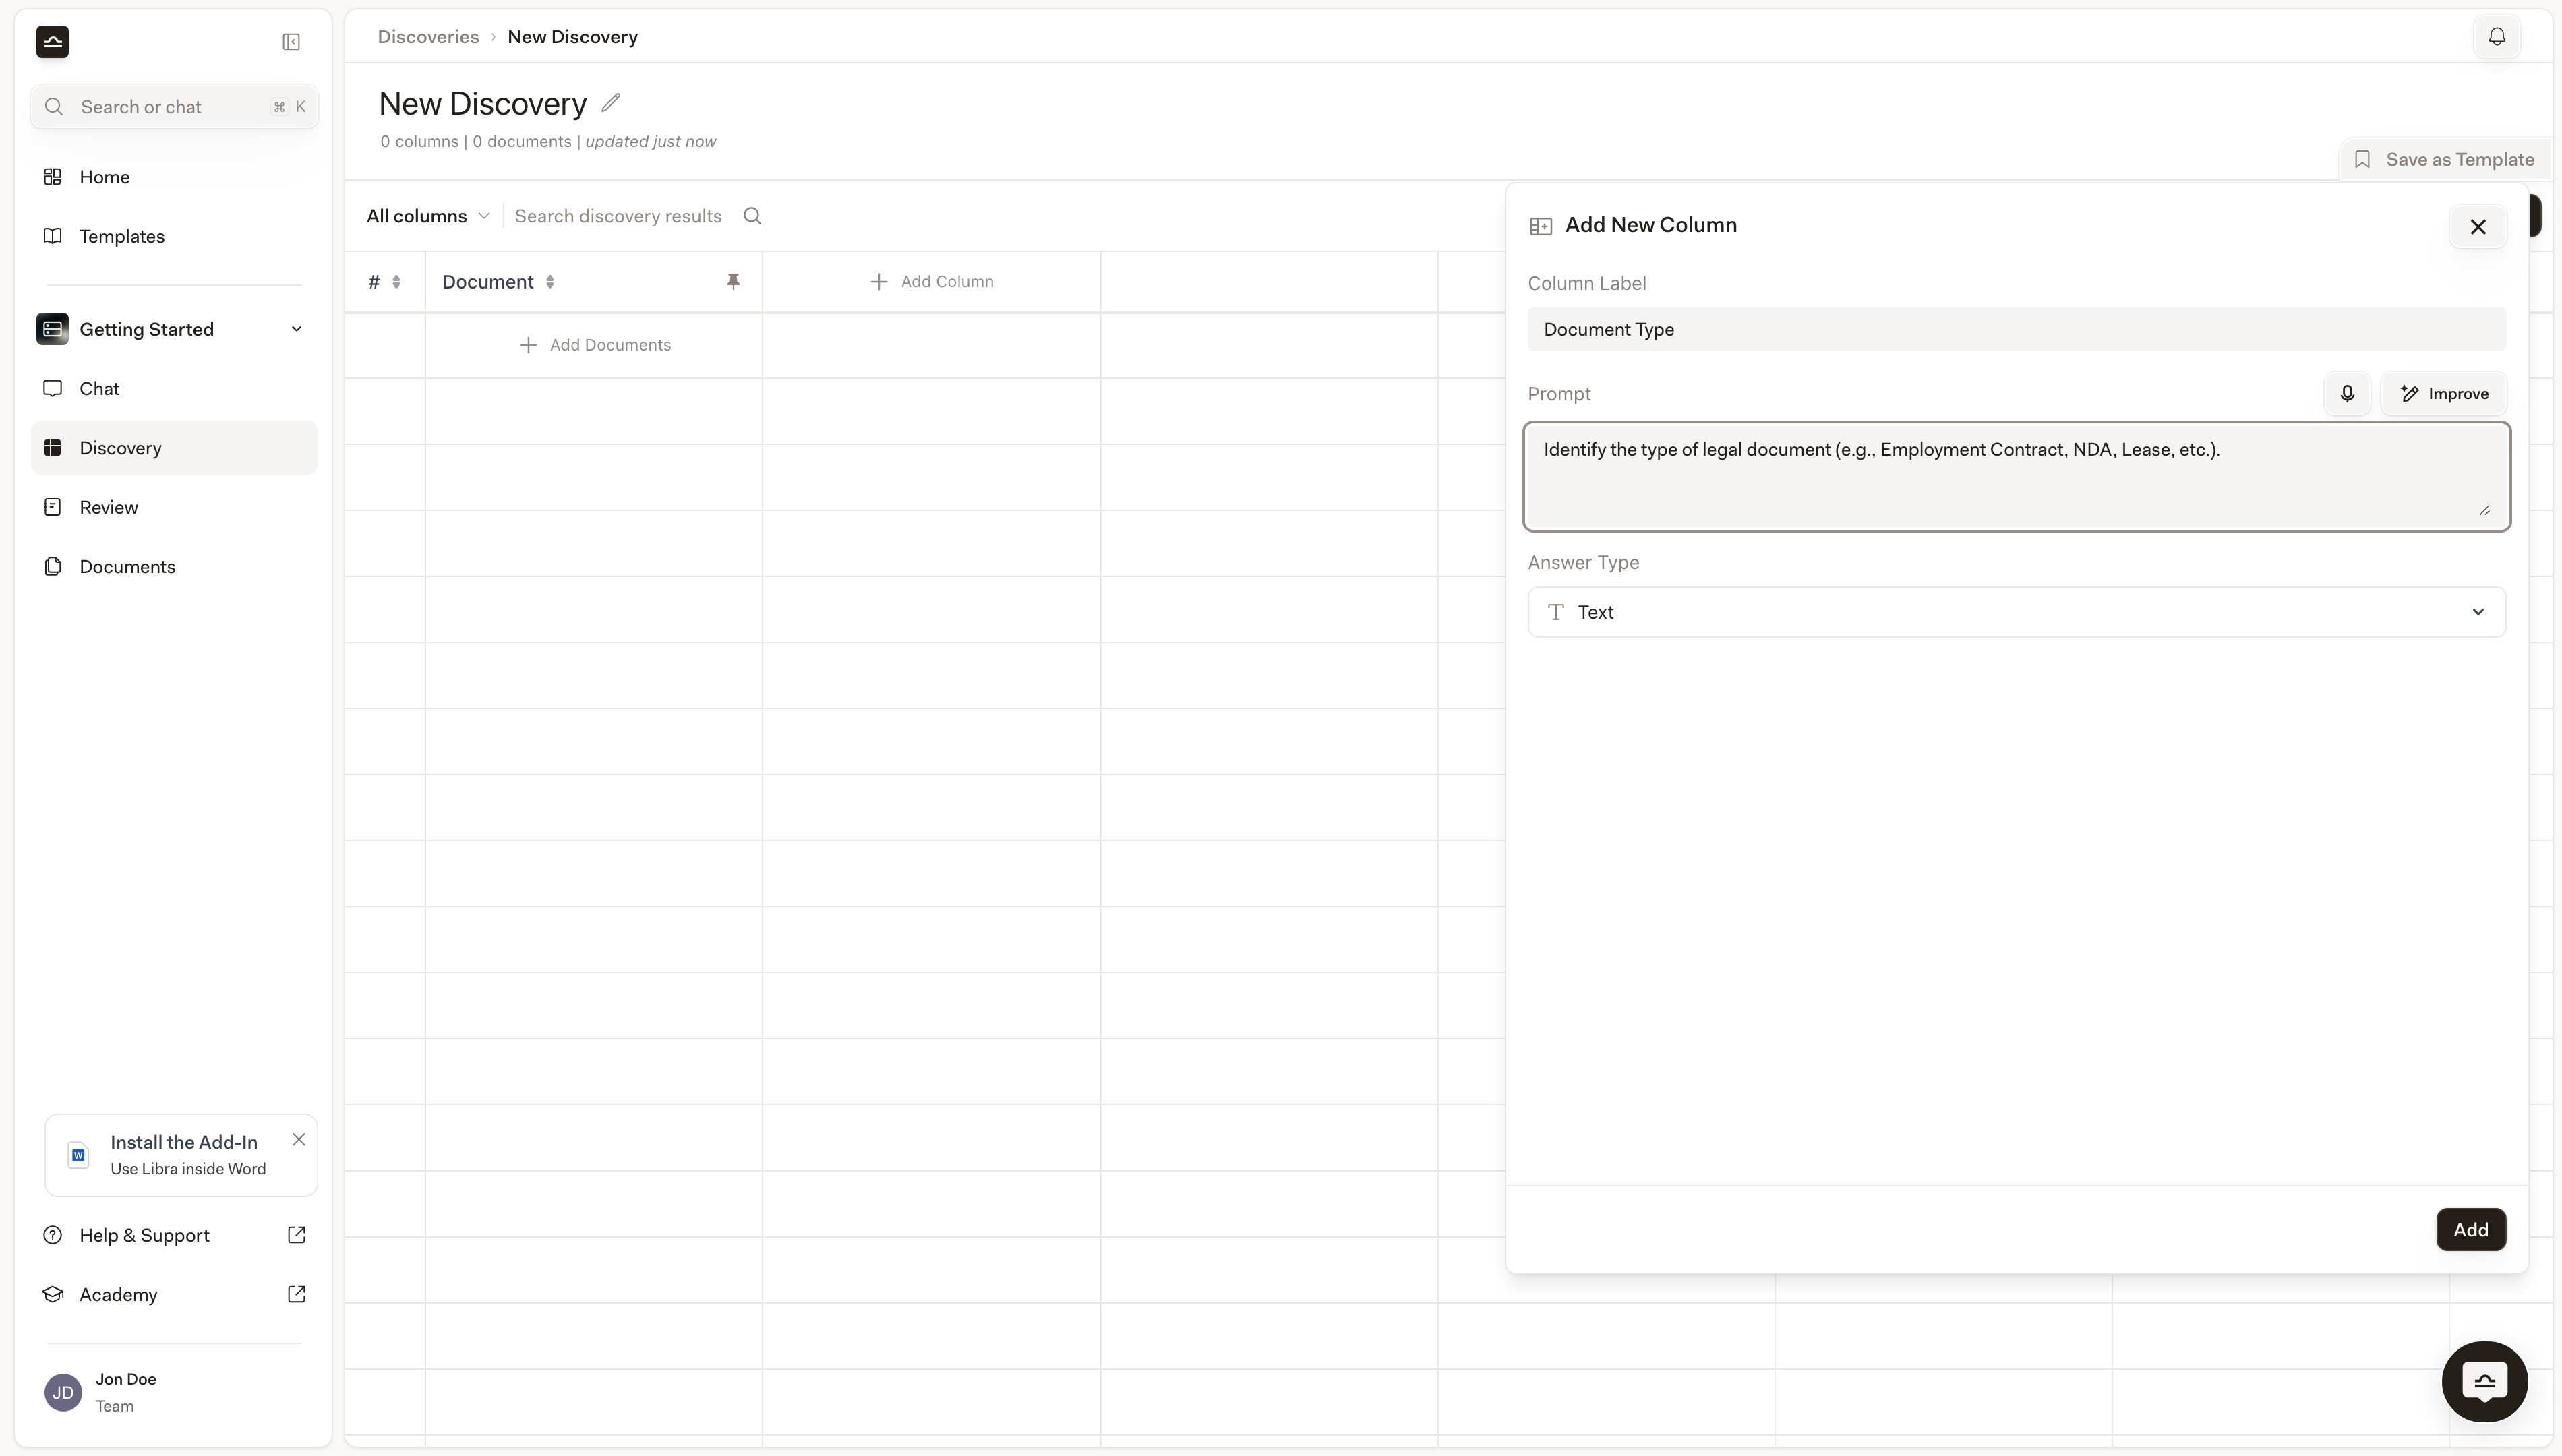
    The button sits in the toolbar above the table, and the table header repeats it after the last column. Either one opens the **Add New Column** panel on the right.

    <img src="https://mintcdn.com/libra-4206ec93/DvY4COCBKazHNw7v/assets/images/app/discovery-add-column.png?fit=max&auto=format&n=DvY4COCBKazHNw7v&q=85&s=66ed9d2d18b2f26634a659ec54f8fb38" alt="Add New Column panel with Column Label, Prompt, and Answer Type fields" width="3800" height="2160" data-path="assets/images/app/discovery-add-column.png" />
  </Step>

  <Step title="Set the Column Label">
    The header text. Short and clear: *"Document Type"*, *"Notice Period"*, *"Counterparty"*.
  </Step>

  <Step title="Write the Prompt">
    The instruction Libra follows when extracting. It's optional, but the more specific it is, the better the result.

    Bad: *"Extract notice period."*
    Good: *"Identify the notice period for termination, in days. If multiple notice periods are specified, return the longest."*

    If you'd rather not phrase it yourself, write a rough version and click **Improve** — Libra rewrites the prompt in place. The microphone next to it dictates instead of typing.
  </Step>

  <Step title="Pick the Answer Type">
    The type determines how the cell is rendered and how the column sorts.

    | Type            | Best for                                                               |
    | --------------- | ---------------------------------------------------------------------- |
    | **Text**        | Free-form descriptions, names, summaries.                              |
    | **Yes/No**      | Presence checks (e.g. "Does the contract have a non-compete clause?"). |
    | **Number**      | Quantities (e.g. headcount, days, percentages).                        |
    | **Date**        | Signing dates, deadlines, expiry.                                      |
    | **Currency**    | Monetary values.                                                       |
    | **Bullet List** | Multiple items per cell.                                               |
  </Step>

  <Step title="Click Add">
    The column appears in the table, empty until you run the Discovery.
  </Step>
</Steps>

<Tip>
  Start with three or four important columns. Once they extract well, add more. It's easier to debug a small Discovery than a sprawling one.
</Tip>

## Add documents

By default each document becomes a row.

<Steps>
  <Step title="Click Add Documents">
    The button sits in the toolbar above the table, and an empty table repeats it in the first row.

    <img src="https://mintcdn.com/libra-4206ec93/DvY4COCBKazHNw7v/assets/images/app/discovery-add-documents-button.png?fit=max&auto=format&n=DvY4COCBKazHNw7v&q=85&s=05443fdfe2f128c5497191e7f01fe244" alt="Discovery toolbar with Add Documents button highlighted" width="3800" height="2160" data-path="assets/images/app/discovery-add-documents-button.png" />
  </Step>

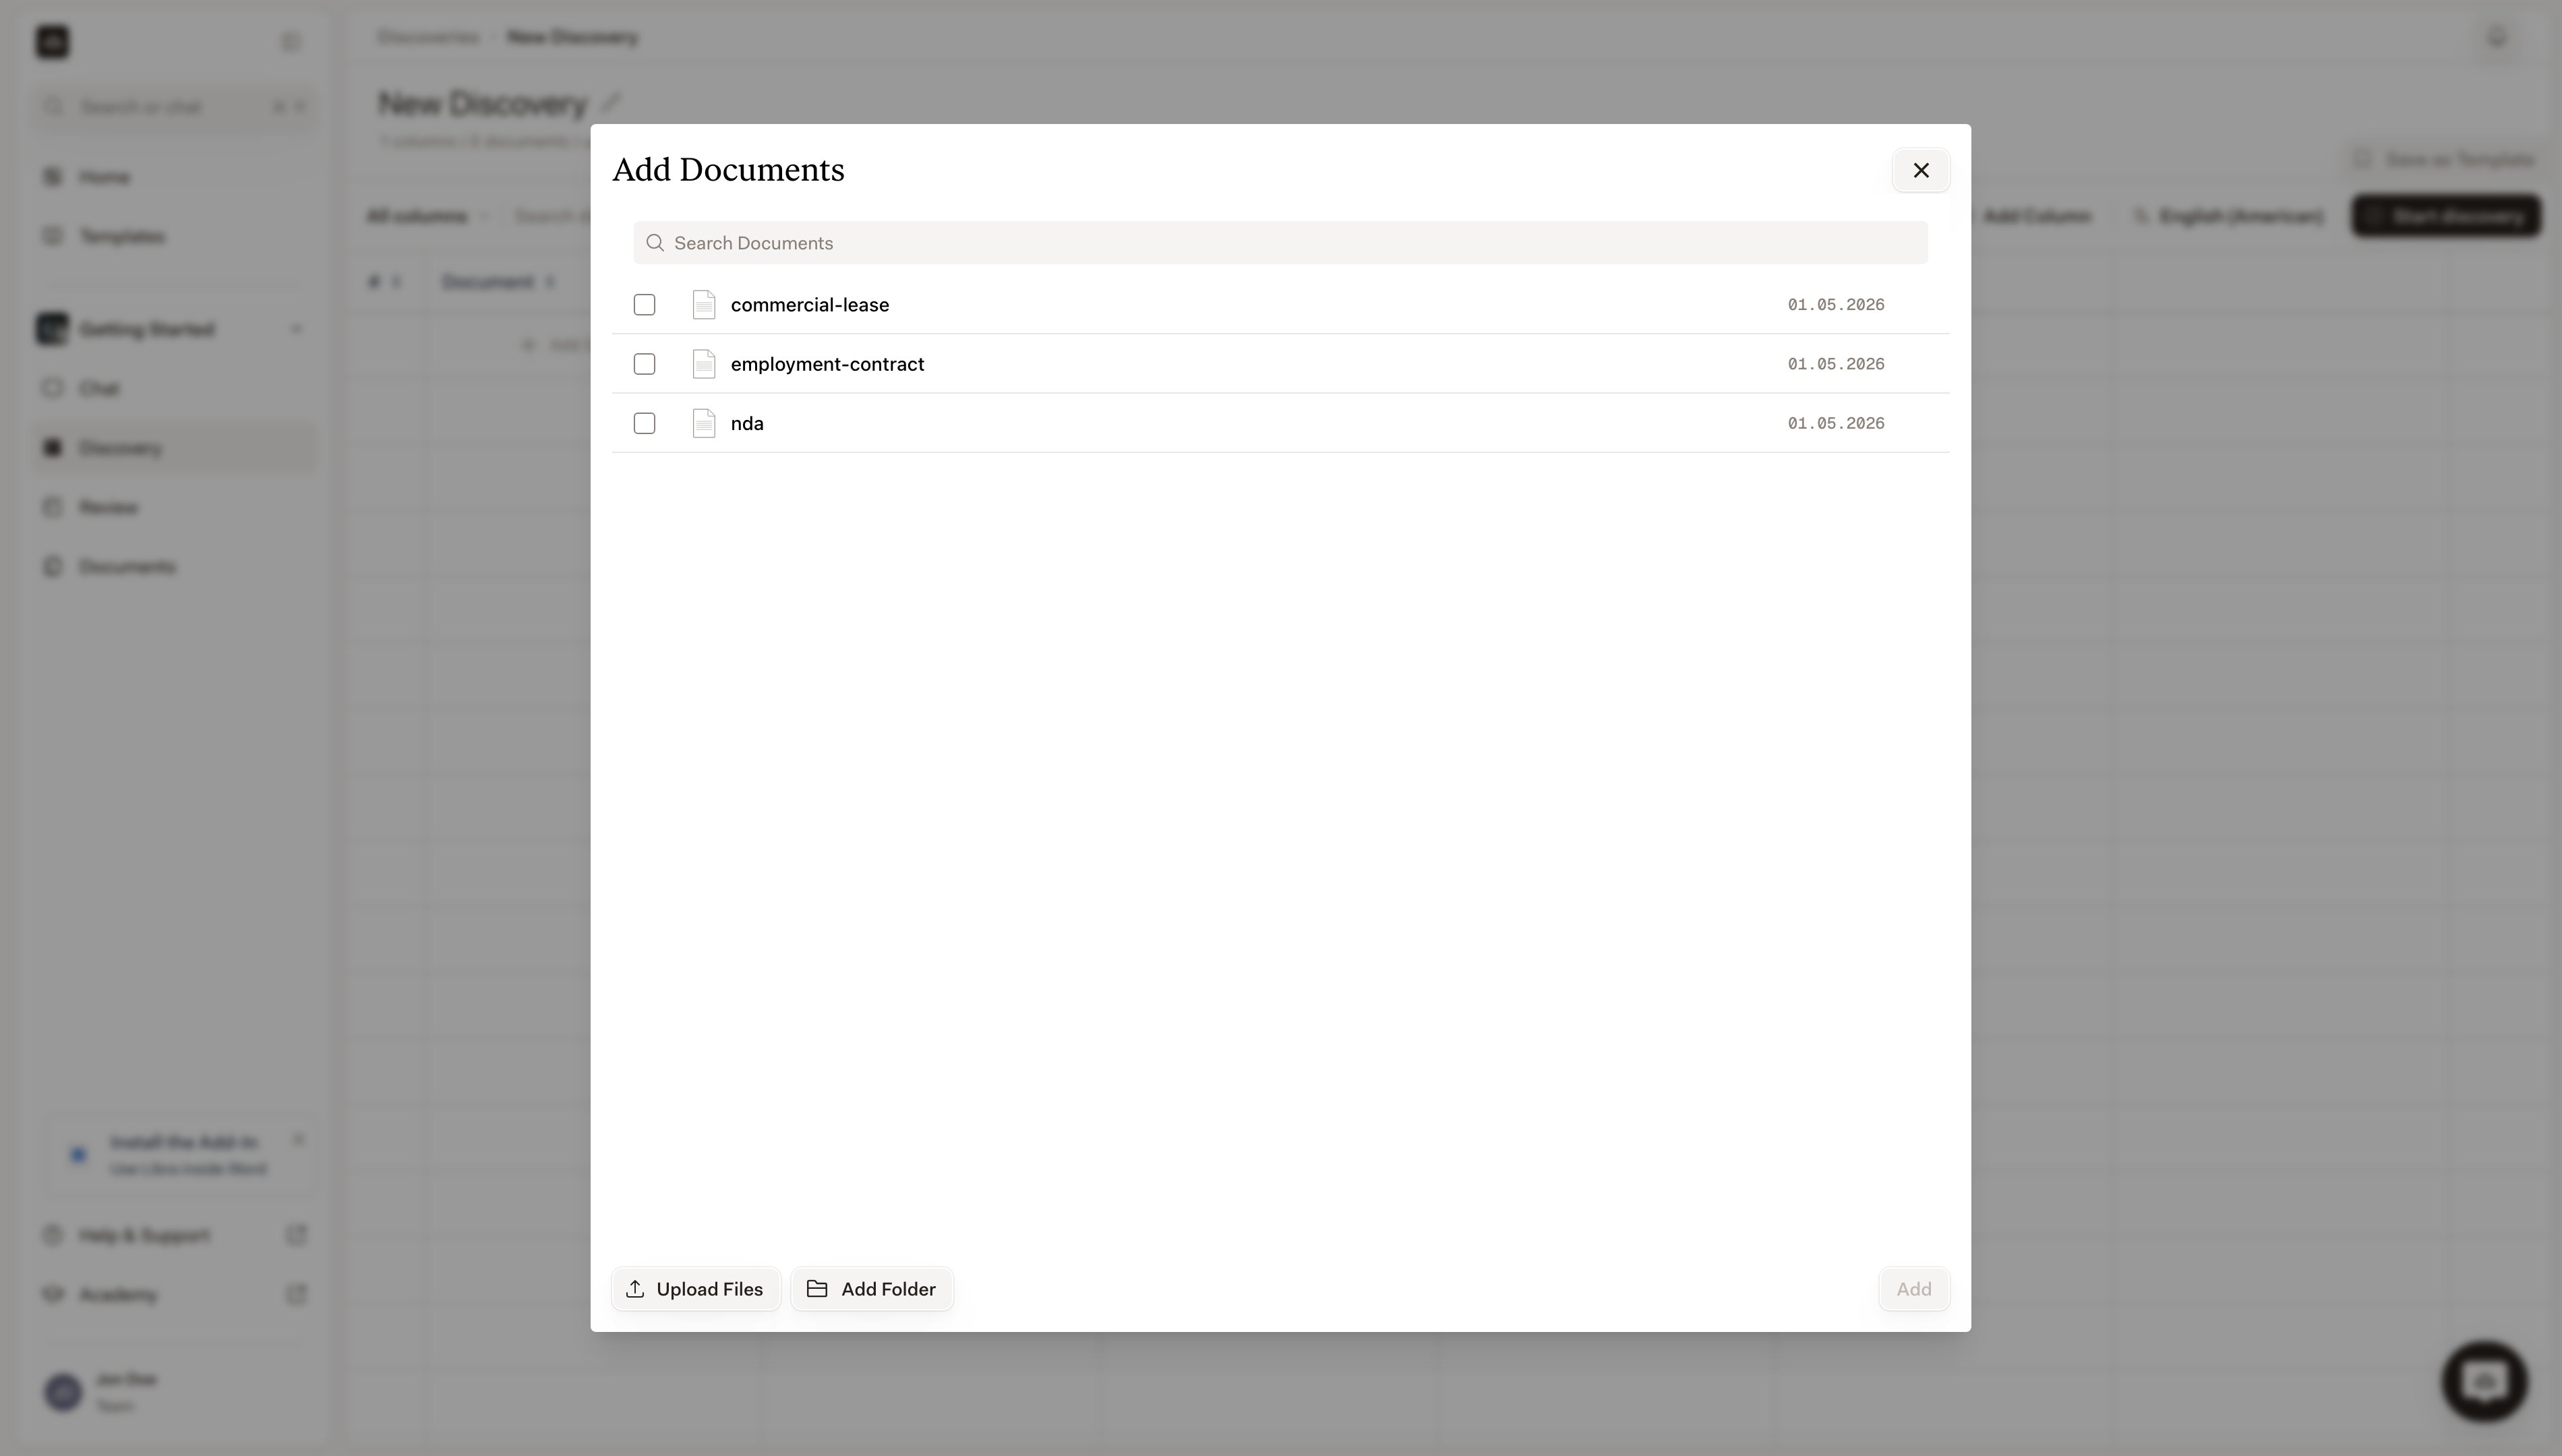
  <Step title="Pick from Project files, or upload">
    The picker opens onto the project's **Project files**. Select what you need there, or bring in new material with **Upload Files** or **Upload Folders** (PDFs, Word, images, emails, text; see [File types & previews](/en/features/documents/file-types)).

    A file has to have finished processing before it can go into a Discovery. If you select one that hasn't, Libra names it and leaves it out; wait for it to finish in **Project files** and add it then. Documents already in the Discovery are skipped the same way.

    <img src="https://mintcdn.com/libra-4206ec93/DvY4COCBKazHNw7v/assets/images/app/discovery-document-picker.png?fit=max&auto=format&n=DvY4COCBKazHNw7v&q=85&s=29bab7b9cde9cb1d56f49de993bd131f" alt="Add Documents picker listing the project's files with a checkbox beside each one" width="3800" height="2160" data-path="assets/images/app/discovery-document-picker.png" />
  </Step>

  <Step title="Choose one row or many">
    With a single file selected, click **Add**. Select more than one and Libra offers a choice instead. The primary button counts your selection — **Add as 3 rows**, say — and gives each document its own row, which is what you want when you're comparing contracts side by side. **Add as 1 row** folds the whole selection into a single row, for when several files are really one matter: a contract plus its annexes.
  </Step>

  <Step title="Click Start discovery">
    **Start discovery** needs at least one document and at least one column; without them Libra tells you what's missing instead of starting.

    <img src="https://mintcdn.com/libra-4206ec93/DvY4COCBKazHNw7v/assets/images/app/discovery-start-button.png?fit=max&auto=format&n=DvY4COCBKazHNw7v&q=85&s=db05510a2645f9cd1444b3a3d9daf442" alt="Discovery table with documents added and the Start discovery button ready" width="3800" height="2160" data-path="assets/images/app/discovery-start-button.png" />
  </Step>

  <Step title="Watch results stream in">
    Cells fill in as Libra extracts each value, with a progress bar under the title. You can leave the page and come back — extraction carries on — and **Cancel** in the toolbar stops it. If you're still on the page when the run lands, the toolbar confirms **Discovery completed**.

    <img src="https://mintcdn.com/libra-4206ec93/DvY4COCBKazHNw7v/assets/images/app/discovery-in-progress.png?fit=max&auto=format&n=DvY4COCBKazHNw7v&q=85&s=f47e37894ef672f1888184356ac4453a" alt="Discovery streaming results with cells filling in live" width="3800" height="2160" data-path="assets/images/app/discovery-in-progress.png" />
  </Step>
</Steps>

## Work with results

After the Discovery completes, the table is sortable, searchable, and clickable.

### Sort and search

Click any column header to sort by it, including the **#** and **Document** columns; click again to reverse the order. Sorting respects the answer type — **Date**, **Number** and **Currency** columns order by value rather than alphabetically — and cells that are empty or still running always fall to the bottom.

The **Search discovery results** box above the table filters rows as you type. The dropdown beside it starts at **All columns**; narrow it to a single column when a word you're hunting for turns up everywhere. A toggle in the same row switches the table between compact and expanded cells, which is the quicker fix when long answers are being cut off.

<img src="https://mintcdn.com/libra-4206ec93/DvY4COCBKazHNw7v/assets/images/app/discovery-sort-search.png?fit=max&auto=format&n=DvY4COCBKazHNw7v&q=85&s=ad8186d95e3341dd9b6b9263ce522122" alt="Discovery table sorted by a column with search filtering rows" width="3800" height="2160" data-path="assets/images/app/discovery-sort-search.png" />

### Verify a cell

Click any cell and a panel opens on the right with everything Libra used to extract that value, for the whole row, not just the one cell you clicked.
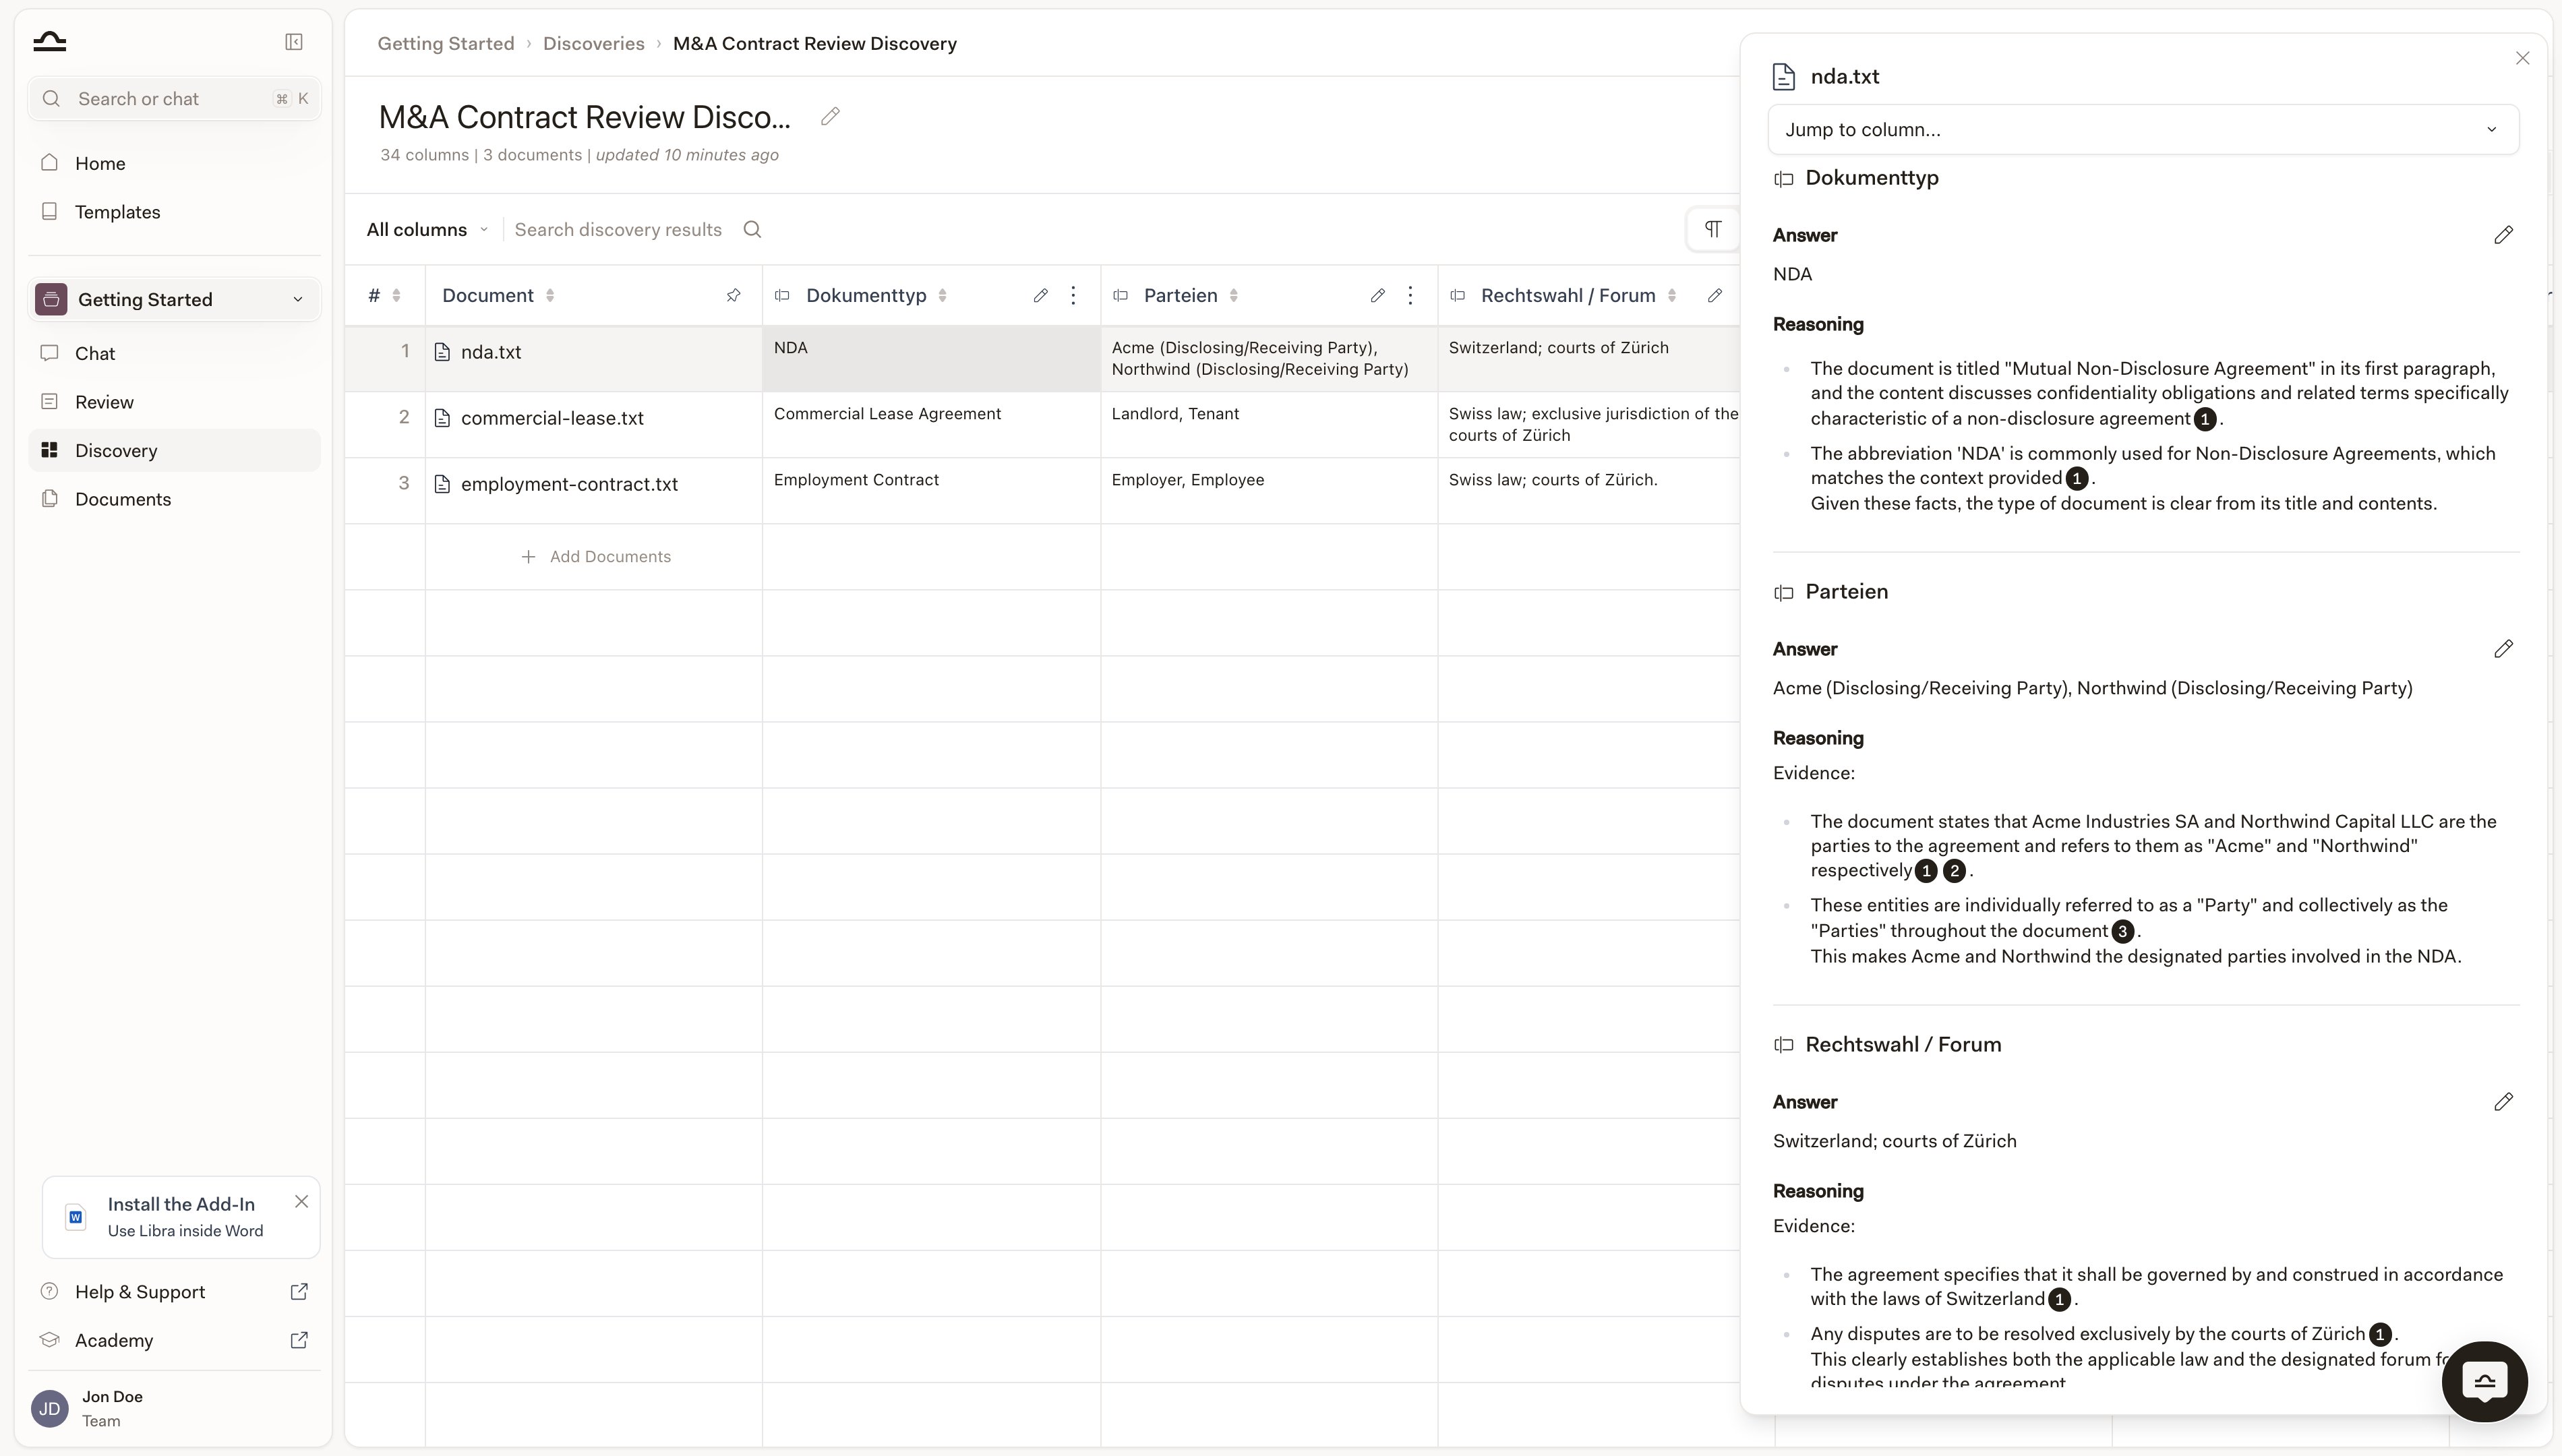
<img src="https://mintcdn.com/libra-4206ec93/DvY4COCBKazHNw7v/assets/images/app/discovery-cell-source.png?fit=max&auto=format&n=DvY4COCBKazHNw7v&q=85&s=11dbc5971f9c7882b6150ee2a79242a7" alt="Discovery with the cell-detail panel open on the right after clicking a cell" width="3800" height="2160" data-path="assets/images/app/discovery-cell-source.png" />

<Steps>
  <Step title="Click any cell in a row">
    The panel slides in on the right, headed with the document name. Use **Jump to column…** at the top to scroll straight to a specific column instead of paging through them.

    <img src="https://mintcdn.com/libra-4206ec93/DvY4COCBKazHNw7v/assets/images/app/discovery-cell-source.png?fit=max&auto=format&n=DvY4COCBKazHNw7v&q=85&s=11dbc5971f9c7882b6150ee2a79242a7" alt="Cell-detail panel open on the right with Jump to column and answers" width="3800" height="2160" data-path="assets/images/app/discovery-cell-source.png" />
  </Step>

  <Step title="Read the Answer and the Reasoning for each column">
    Every column appears as its own block, with two parts. **Answer** is the value Libra put in the cell. **Reasoning** explains how Libra got there, and the small numbered pills (1, 2, 3) sitting inside that text are the citations — each one ties the claim it follows back to a specific passage in the document. Click a pill to open the document at that page, with the passage highlighted.

    <img src="https://mintcdn.com/libra-4206ec93/DvY4COCBKazHNw7v/assets/images/app/discovery-cell-reasoning.png?fit=max&auto=format&n=DvY4COCBKazHNw7v&q=85&s=662c180bfbdd726e508c3065880dd398" alt="Cell-detail panel close-up showing the Answer and Reasoning blocks with numbered citation pills inside the reasoning text" width="1232" height="2084" data-path="assets/images/app/discovery-cell-reasoning.png" />
  </Step>
</Steps>

<Warning>
  AI extraction is highly accurate but not perfect. For high-stakes data, spot-check the cells that drive decisions.
</Warning>

### Edit a cell

If you need to override an extracted value:

<Steps>
  <Step title="Click the cell">
    The detail panel opens on the right.
  </Step>

  <Step title="Click the pencil next to Answer">
    It sits at the right of the **Answer** heading, in the block for the column you want. Type the value you want in its place.

    <img src="https://mintcdn.com/libra-4206ec93/DvY4COCBKazHNw7v/assets/images/app/discovery-cell-reasoning.png?fit=max&auto=format&n=DvY4COCBKazHNw7v&q=85&s=662c180bfbdd726e508c3065880dd398" alt="Cell-detail panel with the pencil icon beside the Answer heading" width="1232" height="2084" data-path="assets/images/app/discovery-cell-reasoning.png" />
  </Step>

  <Step title="Save">
    Click the check to save, or the cross to abandon the edit. Edits are stored on the Discovery; they don't affect the original document.

    Libra keeps the version it extracted. Once a cell has been edited by hand, arrows and a counter (`1/2`) appear beside the **Answer** heading so you can move between the original and your edit, and the table marks which version a cell is showing.
  </Step>
</Steps>

### Add or remove columns after running

You can iterate on a finished Discovery.

<Steps>
  <Step title="Add a new column">
    Click **Add Column** as before. Libra restarts the Discovery to fill the new column across every existing row; answers already extracted for the other columns are kept.

    <img src="https://mintcdn.com/libra-4206ec93/DvY4COCBKazHNw7v/assets/images/app/discovery-add-column.png?fit=max&auto=format&n=DvY4COCBKazHNw7v&q=85&s=66ed9d2d18b2f26634a659ec54f8fb38" alt="Adding a new column to a finished Discovery" width="3800" height="2160" data-path="assets/images/app/discovery-add-column.png" />
  </Step>

  <Step title="Change or reorder a column">
    Every column header carries a pencil (**Edit Column**) and a **More actions** menu. The menu offers **Move left** and **Move right** — each one only when there is a column on that side, and neither while the Discovery is still running. Editing a column's label, prompt or answer type clears that column's answers and extracts them again; the other columns are untouched.
  </Step>

  <Step title="Remove a column">
    **Delete Column** sits at the bottom of the same **More actions** menu. Libra asks you to confirm, and the answers in that column are discarded for good.
  </Step>
</Steps>

### Export

**Export** appears in the toolbar once the Discovery has finished. It opens a short menu of three formats:

| Format   | Best for                                        |
| -------- | ----------------------------------------------- |
| **XLSX** | Anything you'll go on to filter, sort or pivot. |
| **CSV**  | Pulling the data into another tool.             |
| **DOCX** | Dropping the table into a memo.                 |

On a narrow window the toolbar collapses into a single chevron; the same three formats sit in that menu as **Export to DOCX**, **Export to XLSX** and **Export to CSV**.

All three export the same thing: the row number, the document name (plus the names of any attachments on that row), and every cell value, with an em dash wherever a cell failed. Answers are written out as plain text, so any formatting in them is flattened, and no format carries the citations or the **Reasoning** across — those stay in Libra. If someone needs to follow the evidence, send them the Discovery rather than the export.

## Continue analysis in chat

Once you have a Discovery, the most powerful next step is to ask follow-up questions about it.

<Steps>
  <Step title="Open a chat in the same project">
    From the project sidebar, click **Chat** to open a new conversation. Discoveries are project-scoped, so the chat needs to live in the same project as the Discovery.
  </Step>

  <Step title="Attach the Discovery as context">
    Type `@` in the chat input, or use **Tools → Add context**, and pick the Discovery from the **Discoveries** section of the picker. It lists the Discoveries in the project you're currently in.

    <img src="https://mintcdn.com/libra-4206ec93/DvY4COCBKazHNw7v/assets/images/app/discovery-attach-as-context.png?fit=max&auto=format&n=DvY4COCBKazHNw7v&q=85&s=dd6c308516e7f7bfda2e266df50ef5d0" alt="Chat @-mention picker with a Discovery listed under the Discoveries section" width="3800" height="2160" data-path="assets/images/app/discovery-attach-as-context.png" />
  </Step>

  <Step title="Ask a follow-up">
    *"Which rows have notice periods longer than 90 days?"*, *"Compare counterparties by contract value, sorted descending."*, *"Draft an email summarising the high-value contracts for the partner."*
  </Step>

  <Step title="Read the citation-backed answer">
    Libra cites specific cells, rows, and columns. See [Discovery from chat](/en/features/discovery/from-chat).
  </Step>
</Steps>

## Tips for effective Discoveries

<AccordionGroup>
  <Accordion title="Group similar documents in one Discovery">
    A Discovery on a mix of NDAs, leases, and employment contracts will produce inconsistent columns. Split by document type.
  </Accordion>

  <Accordion title="Write specific column prompts">
    *"Extract notice period in days, taking the longest if multiple are specified"* gives consistent results across documents. *"Notice period?"* doesn't.
  </Accordion>

  <Accordion title="Use the right answer type">
    A *Currency* column sorts by amount; a *Text* column sorts alphabetically, so "€90,000" lands next to "€9,000,000". Pick the type up-front — switching it later clears the column and runs it again.
  </Accordion>

  <Accordion title="Verify columns that drive decisions">
    Spot-check the cells that you'll use to make a decision, at least one cell per column, on a high-stakes Discovery.
  </Accordion>

  <Accordion title="Save as Template once it works">
    Once a Discovery's columns are tuned, click **Save as Template** next to the title. It saves the columns, not the documents, so the next time you have a similar set of files you start with the questions already written. See [Discovery templates](/en/features/discovery/templates).
  </Accordion>
</AccordionGroup>

## Next steps

<Columns cols={2}>
  <Card title="Discovery templates" icon="https://mintcdn.com/libra-4206ec93/vIwxn8dmEk0jsP5x/assets/images/icons/discovery.svg?fit=max&auto=format&n=vIwxn8dmEk0jsP5x&q=85&s=db1cd1f10cf28b892531af607cf1fd26" href="/en/features/discovery/templates" width="16" height="16" data-path="assets/images/icons/discovery.svg">
    Reuse and share Discovery configurations.
  </Card>

  <Card title="Reference in chat" icon="https://mintcdn.com/libra-4206ec93/vIwxn8dmEk0jsP5x/assets/images/icons/chat.svg?fit=max&auto=format&n=vIwxn8dmEk0jsP5x&q=85&s=9a77dbd38fde763e8ac783fb8a68aef6" href="/en/features/discovery/from-chat" width="16" height="16" data-path="assets/images/icons/chat.svg">
    Use a finished Discovery as context for follow-up.
  </Card>
</Columns>