
> ## Documentation Index
> Fetch the complete documentation index at: https://docs.libratech.ai/llms.txt
> Use this file to discover all available pages before exploring further.

# Assistants

> How to use Libra Assistants within Microsoft Word.

<video autoPlay muted loop playsInline src="https://mintcdn.com/libra-4206ec93/5Pm7pEl9igcUcCSB/assets/videos/integrations/word/assistants.webm?fit=max&auto=format&n=5Pm7pEl9igcUcCSB&q=85&s=d2d2ff733b165605feb605ed21ec5e13" className="rounded-xl border w-full" data-path="assets/videos/integrations/word/assistants.webm" />

<div className="libra-buddy-callout">
  <img src="https://mintcdn.com/libra-4206ec93/wgVZXcGnHS4aJk9T/assets/images/libra-buddy/clipboard.png?fit=max&auto=format&n=wgVZXcGnHS4aJk9T&q=85&s=cde036cf23ea2d67cd50f1c295db549a" alt="Libra mascot with clipboard" width="725" height="605" data-path="assets/images/libra-buddy/clipboard.png" />

  <div className="libra-buddy-callout-content">
    Highlight the clause first, *then* pick the Assistant. The selection arrives as a **Selected Text** chip above the input, which is sharper than turning the Assistant loose on the whole document.
  </div>
</div>

The Assistants from the Libra web app are available in the Word add-in too — the ones you built, the ones colleagues shared with you, and Libra's own library. Picking one in Word applies exactly what it applies in the web app: its prompt instructions, its knowledge documents, and the research sources it was configured with. See [Assistants](/en/features/assistants/introduction) for what goes into one.

## Pick an Assistant

<Steps>
  <Step title="Open the picker">
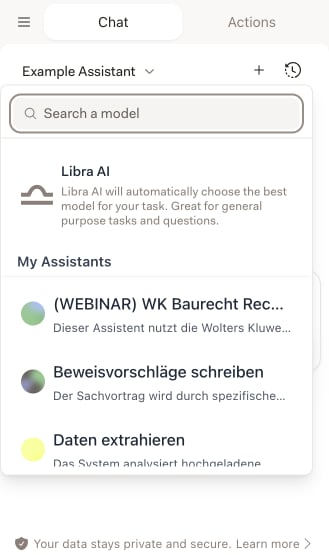
    In the **Chat** tab, click the name at the top left of the panel. It always shows whatever the chat is currently running on — an Assistant, or a model — with a chevron beside it.

    <img src="https://mintcdn.com/libra-4206ec93/vIwxn8dmEk0jsP5x/assets/images/integrations/word/assistants-picker.png?fit=max&auto=format&n=vIwxn8dmEk0jsP5x&q=85&s=ee4c05c4259a3ead9831398d113a0c7d" alt="Assistant picker open in the Word panel, showing the search field, the Libra AI entry and the My Assistants section" width="329" height="555" data-path="assets/images/integrations/word/assistants-picker.png" />
  </Step>

  <Step title="Find the one you want">
    Type in **Search a model** at the top. It matches Assistant names — including the names of every language version, so a German-named Assistant still turns up when you search its English name. Each section shows five Assistants at a time; **Show all** expands it and **Show less** collapses it again.
  </Step>

  <Step title="Click it">
    The chat switches over immediately. From the next message on you get that Assistant's instructions, knowledge and research sources.
  </Step>
</Steps>

The picker refreshes itself every time you open it, so an Assistant you created in the web app a minute ago is already there — no reloading the add-in.

## What's in the picker

The list is grouped, and a group only appears when it has something in it.

| Entry                 | What it holds                                                                                                                                                             |
| --------------------- | ------------------------------------------------------------------------------------------------------------------------------------------------------------------------- |
| **Libra AI**          | The default entry at the very top. It chooses the best model for your task on its own — the right pick when the question isn't what a particular Assistant was built for. |
| **My Assistants**     | Assistants you created.                                                                                                                                                   |
| **Shared Assistants** | Assistants colleagues or your firm shared with you.                                                                                                                       |
| **Libra Assistants**  | Libra's own pre-built library.                                                                                                                                            |
| **Base Models**       | The underlying models, with no instructions or knowledge attached.                                                                                                        |

<Note>
  **Libra Assistants** is filtered by the language your interface is set to: you see the Libra Assistants that have a version in that language, and all of them only if none match. Two colleagues on different interface languages can therefore see different lists.
</Note>

## Choose a language version

An Assistant can carry several language versions, each with its own name, description and prompt instructions. Hover over an Assistant that has more than one and a small language chip appears beside its name showing a two-letter code — **DE**, **EN**, **PL**. Assistants with a single version have no chip.

Click the chip and the Assistant's languages are listed alphabetically; pick one, then click the Assistant to start the chat. The chip is a setting, not a shortcut — choosing a language does not select the Assistant, so the click on the Assistant itself is still needed.

Skip the chip and Libra picks for you: your interface language if the Assistant has a version in it, otherwise the Assistant's first. Whichever version is in play, its name and description are what the picker displays, and the choice is saved with the chat — reopen that conversation later and it comes back in the same language.

## Pin an Assistant

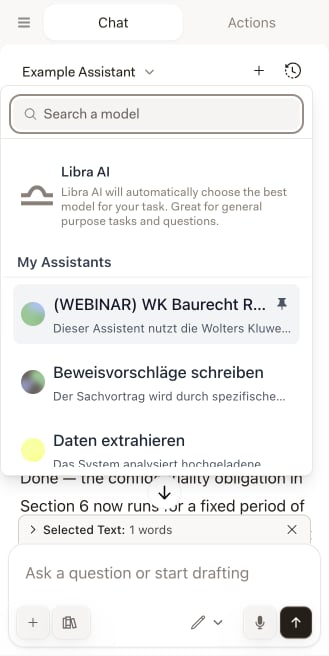
Hover over any Assistant and a pin appears beside its name, tooltipped **Pin to top**. Click it to pin, click it again to unpin. Base models cannot be pinned.

<img src="https://mintcdn.com/libra-4206ec93/vIwxn8dmEk0jsP5x/assets/images/integrations/word/assistants-pin.png?fit=max&auto=format&n=vIwxn8dmEk0jsP5x&q=85&s=0612a9651bd88bceeea476307f25de52" alt="Pin icon appearing beside an Assistant on hover in the Word picker" width="329" height="656" data-path="assets/images/integrations/word/assistants-pin.png" />

Pinning sorts within the Assistant's own section only — **My Assistants**, **Shared Assistants** and **Libra Assistants** always render in that order, so a pinned Shared Assistant rises to the top of its own group rather than the top of the list.

<Warning>
  Pinning does not survive a search. The search filter runs before the pinned sort, so a pinned Assistant whose name doesn't match what you typed disappears from the list like any other.
</Warning>

The pin is remembered by the add-in on the computer you set it on. It isn't stored on your Libra account, so it doesn't travel to the web app or to a second machine.

<div className="libra-buddy-callout">
  <img src="https://mintcdn.com/libra-4206ec93/wgVZXcGnHS4aJk9T/assets/images/libra-buddy/pointing.png?fit=max&auto=format&n=wgVZXcGnHS4aJk9T&q=85&s=fb9114facd16ecd4bc0c89bfbc7d660b" alt="Libra mascot pointing" width="856" height="585" data-path="assets/images/libra-buddy/pointing.png" />

  <div className="libra-buddy-callout-content">
    Pin the two or three you actually reach for — the NDA checker, the clause rewriter, the jurisdiction researcher. Beats scrolling the firm-wide list on every document.
  </div>
</div>

## What an Assistant brings into Word

An Assistant configured with **Knowledge** documents is the one that pays off most in Word: it reads the document you have open against the reference material it already carries — your standard template, the house style guide, the relevant statute — so the analysis is consistent from matter to matter without you attaching anything.

Research sources come across too. If the Assistant has research sources pre-set, selecting it switches **Research** on with exactly those sources; switch back to a plain model and the selection clears again. You can still change the selection afterwards in the **Research** panel, and it holds for the rest of the chat — until you switch Assistant, which reapplies that Assistant's sources or clears them.
<Note>
  If an Assistant relies on a Wolters Kluwer source your account isn't connected to, the picker marks it **Requires connection** and clicking it does nothing but explain why. The add-in cannot run the provider sign-in itself — connect the source in the Libra web app, as described in [Set up](/en/integrations/setup), and the Assistant works in Word from then on.
</Note>

## Tips for using Assistants

<AccordionGroup>
  <Accordion title="Match the Assistant to the task">
    A contract-review Assistant for reviewing, a researcher for sourced questions. The right Assistant beats a general-purpose one with a longer prompt.
  </Accordion>

  <Accordion title="Select text for focus">
    Highlight the section you care about before you ask. The Assistant works on exactly that passage rather than the whole document.
  </Accordion>

  <Accordion title="Build for the documents you see often">
    If you review the same contract type every week, put your standard into an Assistant's **Knowledge** once. After that it's one click per document.
  </Accordion>

  <Accordion title="Use Libra AI when no Assistant fits">
    For a one-off question there's nothing to gain from an Assistant. The **Libra AI** entry at the top of the picker chooses the model for you.
  </Accordion>
</AccordionGroup>

## Create new Assistants

Assistants are built in the Libra web app, not in the add-in. Anything you create or edit there shows up in Word the next time you open the picker.

<Card title="Build a custom Assistant" icon="https://mintcdn.com/libra-4206ec93/vIwxn8dmEk0jsP5x/assets/images/icons/assistants.svg?fit=max&auto=format&n=vIwxn8dmEk0jsP5x&q=85&s=24ac9ed818a343094b45647b10476e70" href="/en/features/assistants/custom" width="24" height="24" data-path="assets/images/icons/assistants.svg">
  Prompt instructions, language versions, research sources and knowledge documents — the full editor.
</Card>
